Inspections
Inspections let you check every apartment of a property with your own checklist, one campaign at a time. The answers, photos and signature are saved, and each problem waits for the office to decide what happens next.
- Who sees it
- Technicians, porters and the maintenance supervisor do the inspections on their phone. The property manager and the supervisor create campaigns, assign buildings and change the checklist. The property manager, the assistant property manager and leasing decide the problems. The property manager does not inspect.
- Where to find it
- The Inspections tile on the home screen. A person with buildings to inspect sees it as Assigned inspections, with their progress.
- What it needs
- The Inspections switch in Modules. Telling residents by the app and by email also needs the resident portal.
What it is for
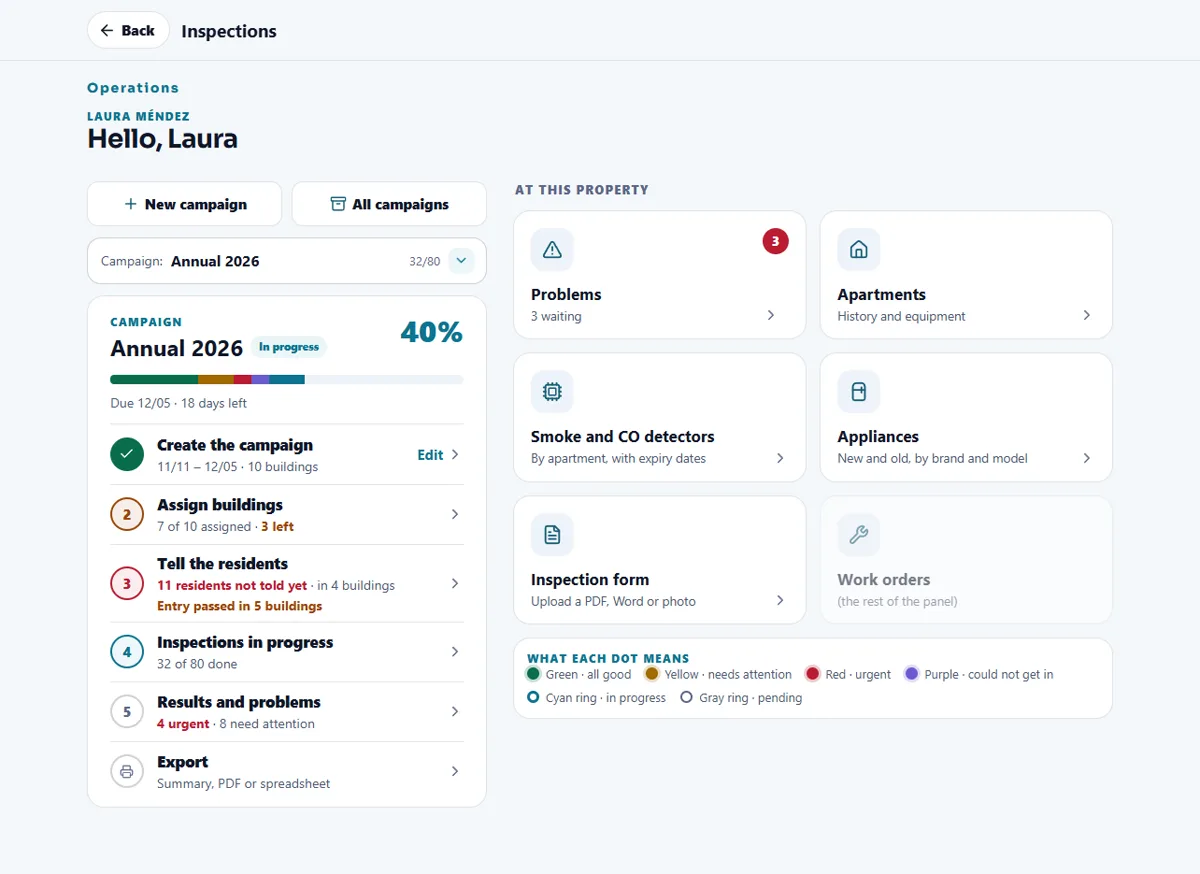
A campaign is one round of inspections, for example an annual inspection of every building. You pick the buildings, the dates and the checklist, decide who inspects each building, tell the residents the day you will enter, and follow the results until every apartment is done. Smoke and CO detectors and appliances are recorded apartment by apartment along the way.
Set up a campaign (property manager or supervisor)
- Create the campaign
Tap New campaign. Write a name, choose the checklist (Form), the Start date, an optional Due date, the entry time (From and Until) and the buildings. Tap Create campaign. If your form does not ask about the air conditioning or the appliances, the app adds that section at the end. To do the same round again, open the campaign and use Repeat: it copies the buildings and the form, and you only choose new dates and people.
- Assign buildings
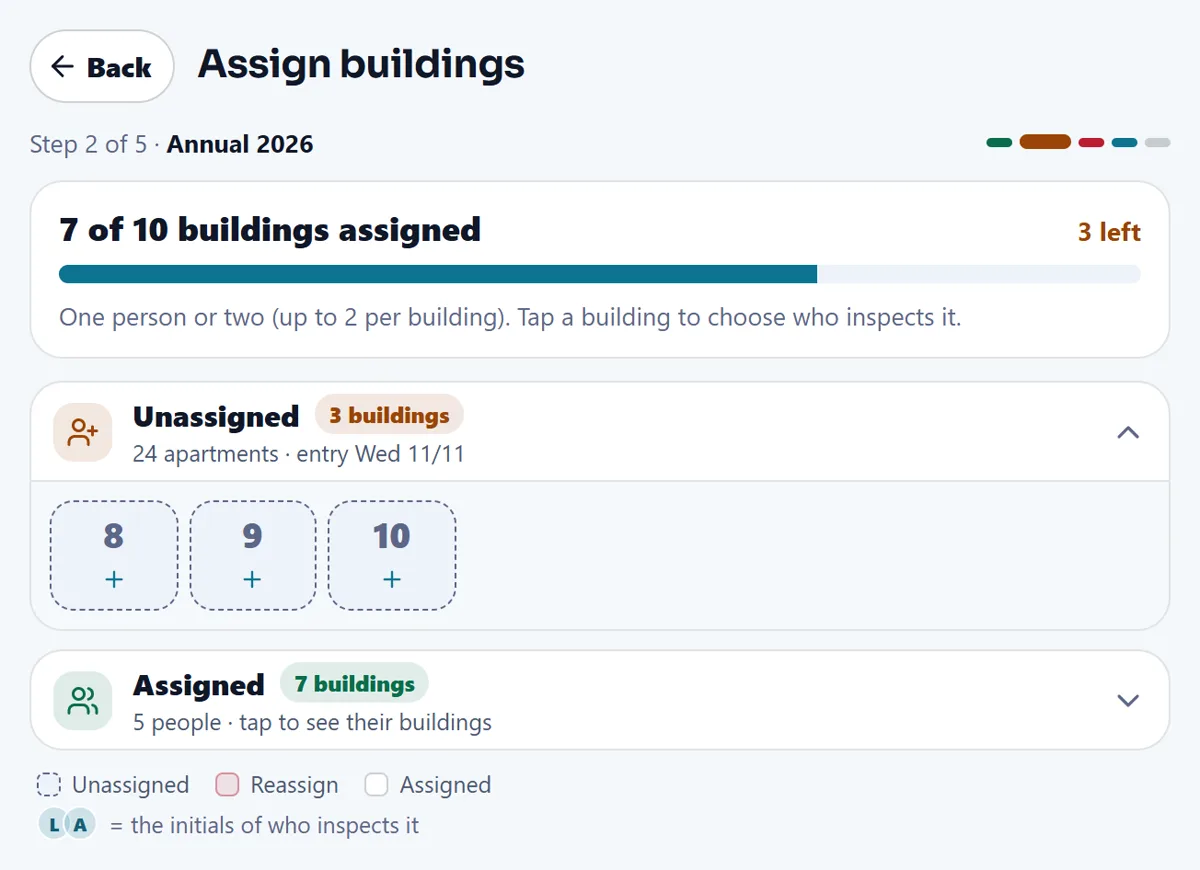
Open Assign buildings and tap a building. Choose one person or a pair (up to 2 per building) from the supervisors, technicians and porters, and set the Entry day of that building. The supervisor can also tap Assign it to myself. Both people of a pair see the building on their phone and either can fill in the form.
- Tell the residents
Open Tell the residents. Each resident gets the day and hours of the entry in their own language, by the app and by email (one email per apartment), or you print door notices. You can also mark an apartment as left on the door, told in person or vacant. When and how is kept. The screen reminds you to give at least 24 hours of notice and never shows resident names.
- Follow the progress
The step Inspections in progress shows how many apartments are done. Results and problems lists every apartment with its color, who did it and when. Tap a row to see the whole inspection with photos, the signature and who marked each answer.
Do an inspection (technician, porter or supervisor)
- Open your buildings
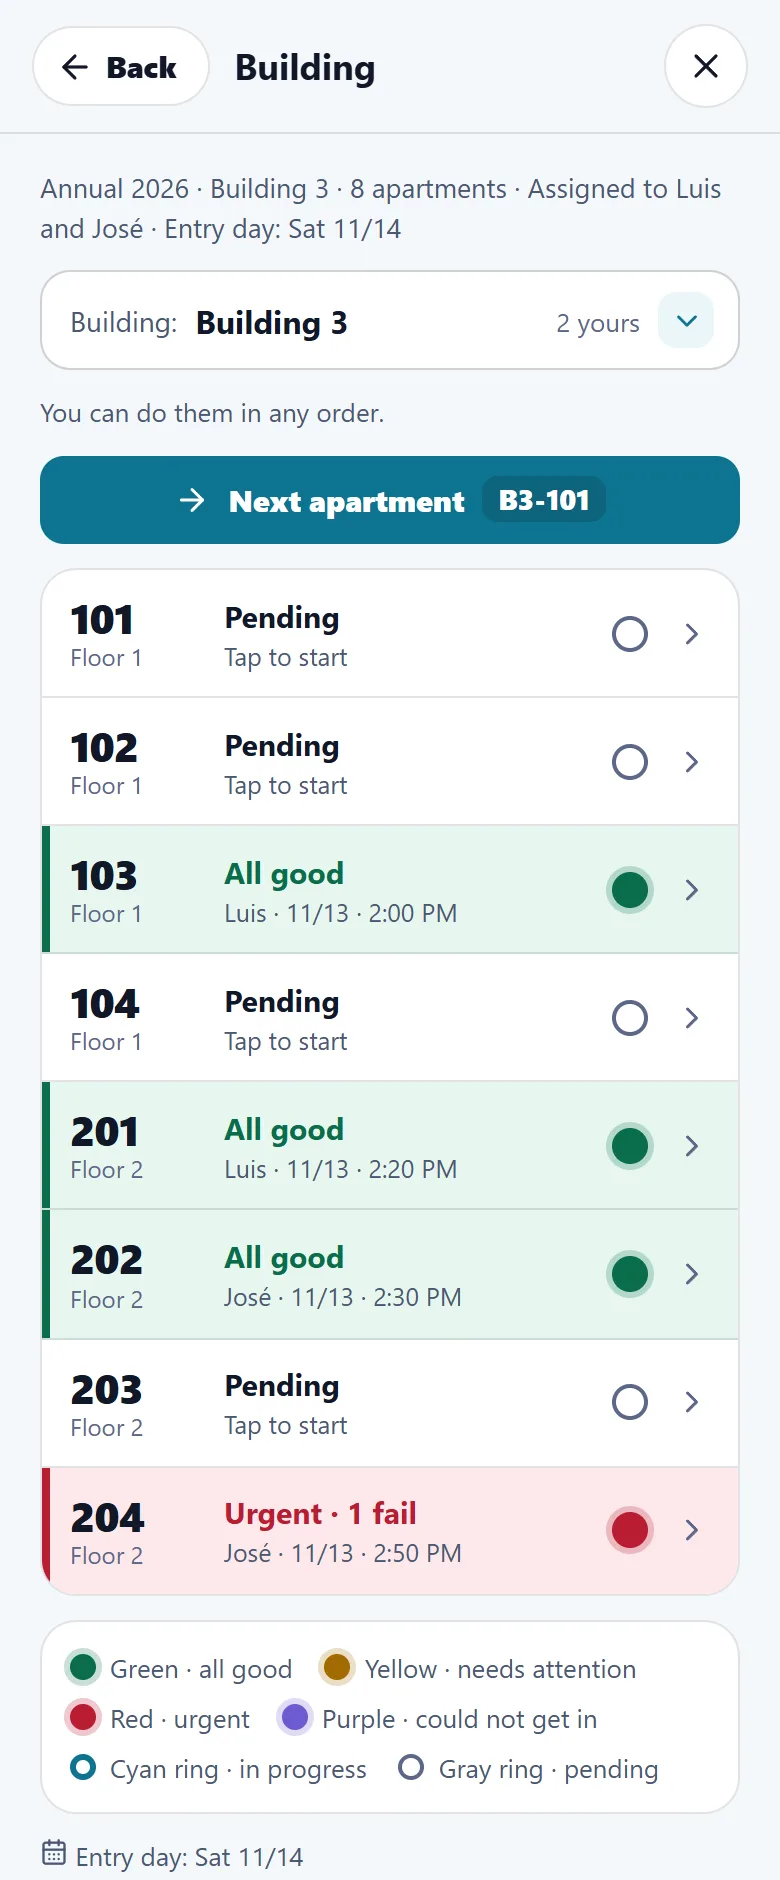
Tap Assigned inspections, then a building. The apartments come in order, and you can do them in any order. Next apartment takes you to the next one.
- Answer the checklist
Each question is Pass, Fail or N/A, or a choice, a number or a text, depending on the form. Go to jumps to a section. The date, the inspector and the apartment fill in by themselves.
- When something fails
Write what is wrong (it is required), choose Needs attention or Urgent (a leak, mold or an emergency) and add up to 3 photos. A quick phrase can be inserted with one tap and the other person reads it in their language.
- Smoke and CO detectors
Scan the label with the phone camera or type it in, and test each detector. The label is read on the phone and nothing leaves it.
- Finish and sign
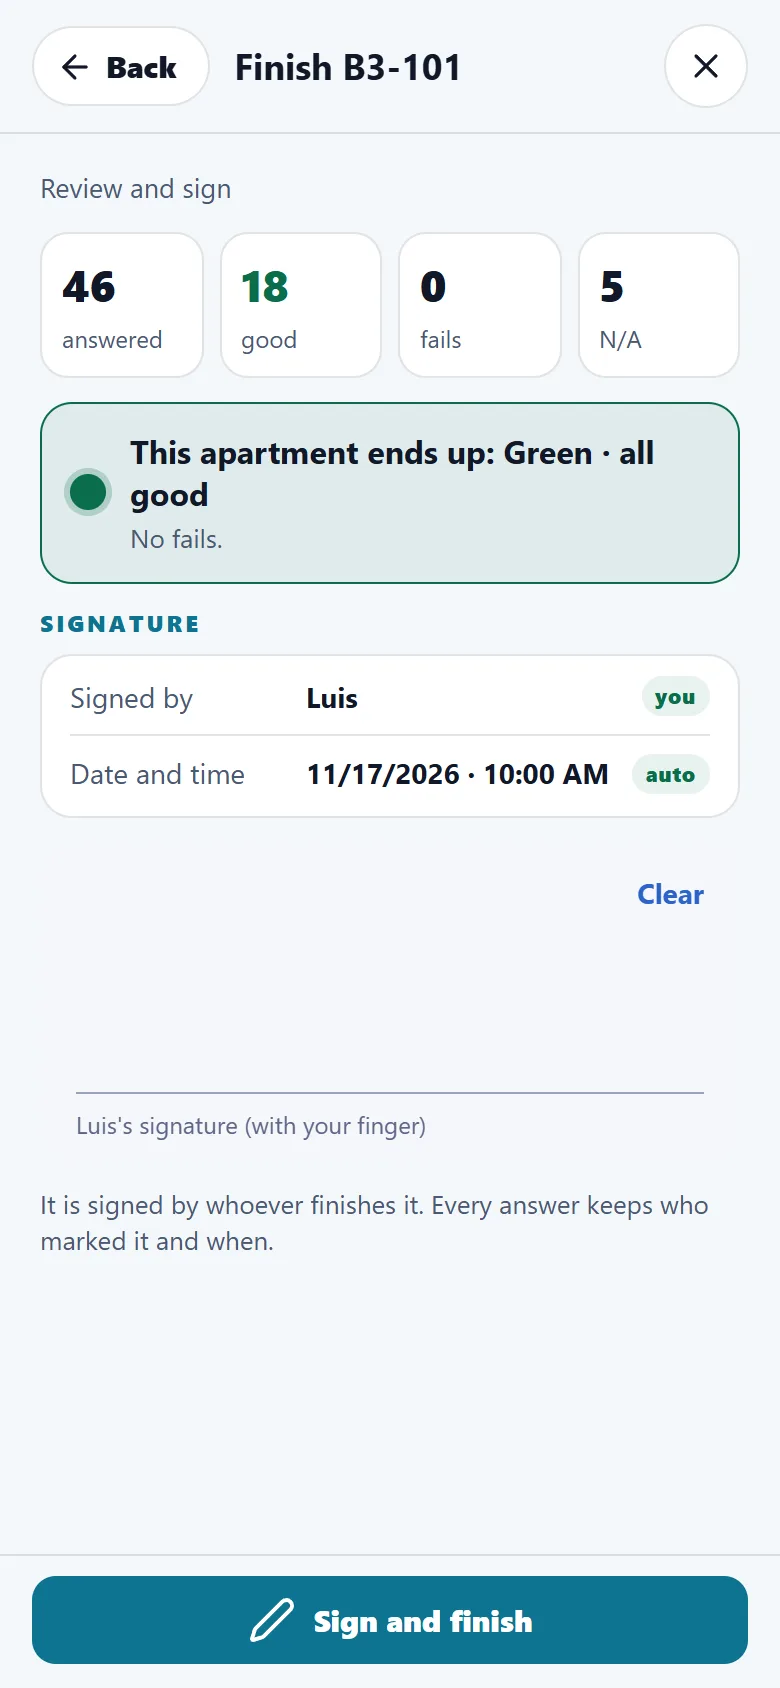
Tap Finish and sign. The screen shows how many answers, how many are good and how many failed, and the color the apartment ends up with: green, yellow or red. Sign with your finger and tap Sign and finish.
- If you cannot get in
Tap Could not get in and choose Loose dog, Resident refused, The key does not work or another reason. The apartment shows apart in purple for the property manager and the supervisor, with the reason, so you can try again another day.
With no signal the phone keeps your answers and sends them when the signal is back. Photos need a connection.
Decide the problems (office)
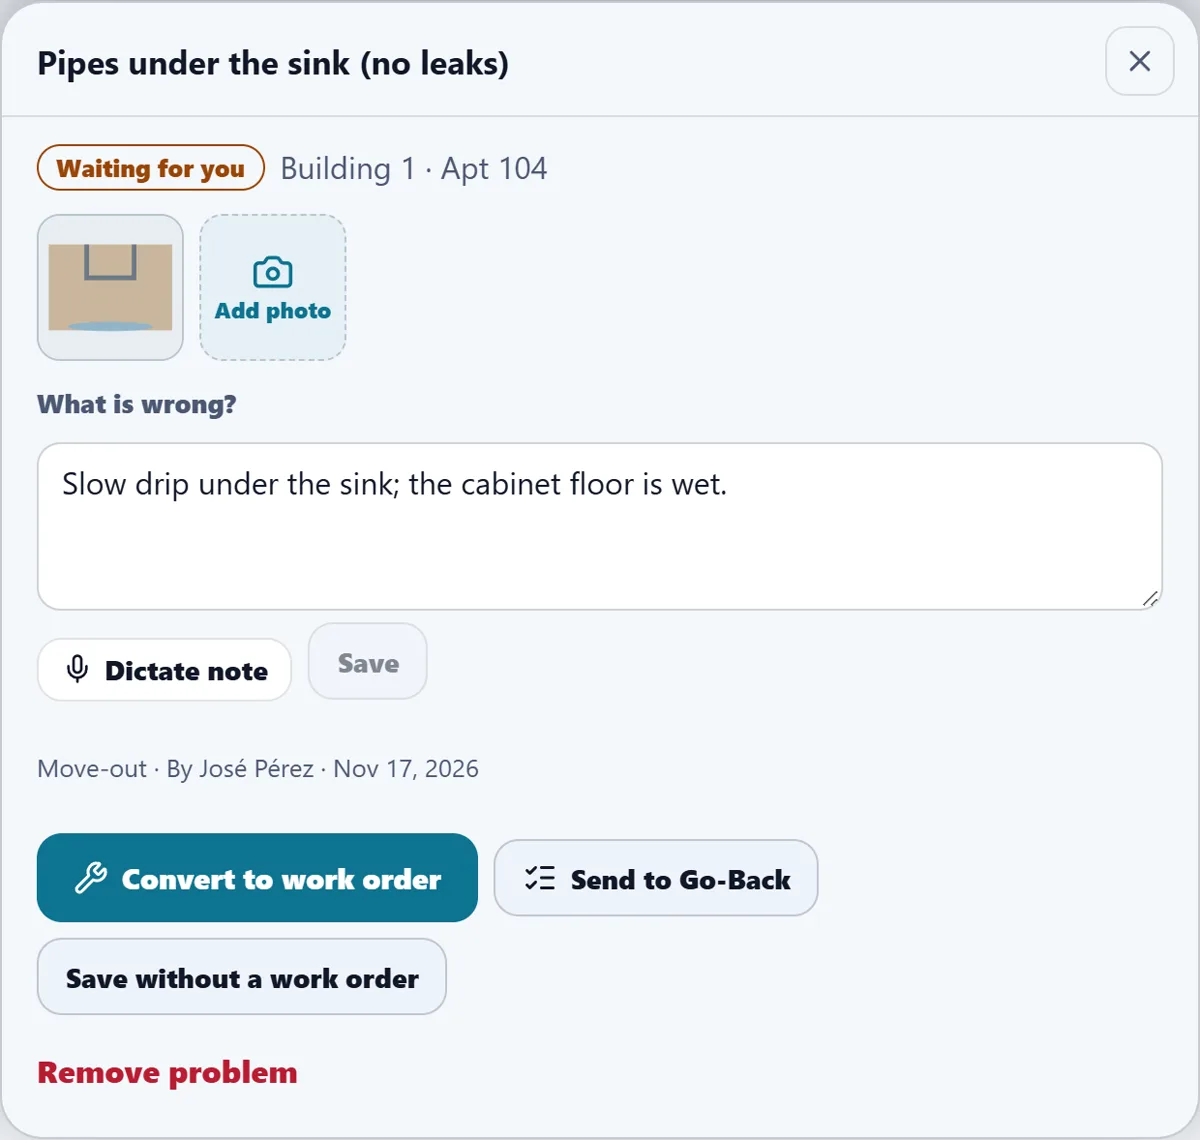
Each fail is saved as a problem for the office. The office finds them under Problems: Waiting for you, Saved, Work orders, Go-Backs or All. Tap a problem to see the photos and the note, then choose:
- Convert to work order. Check the title, category, priority and worker (or Don’t assign now) and tap Create work order. An emergency with nobody assigned goes to the person on call with the siren.
- Send to Go-Back. Adds the task to the Go-Back of that apartment. It needs the Make Ready module.
- Save without a work order. Keeps it as a record. Back to waiting undoes it.
Detectors, appliances and the checklist
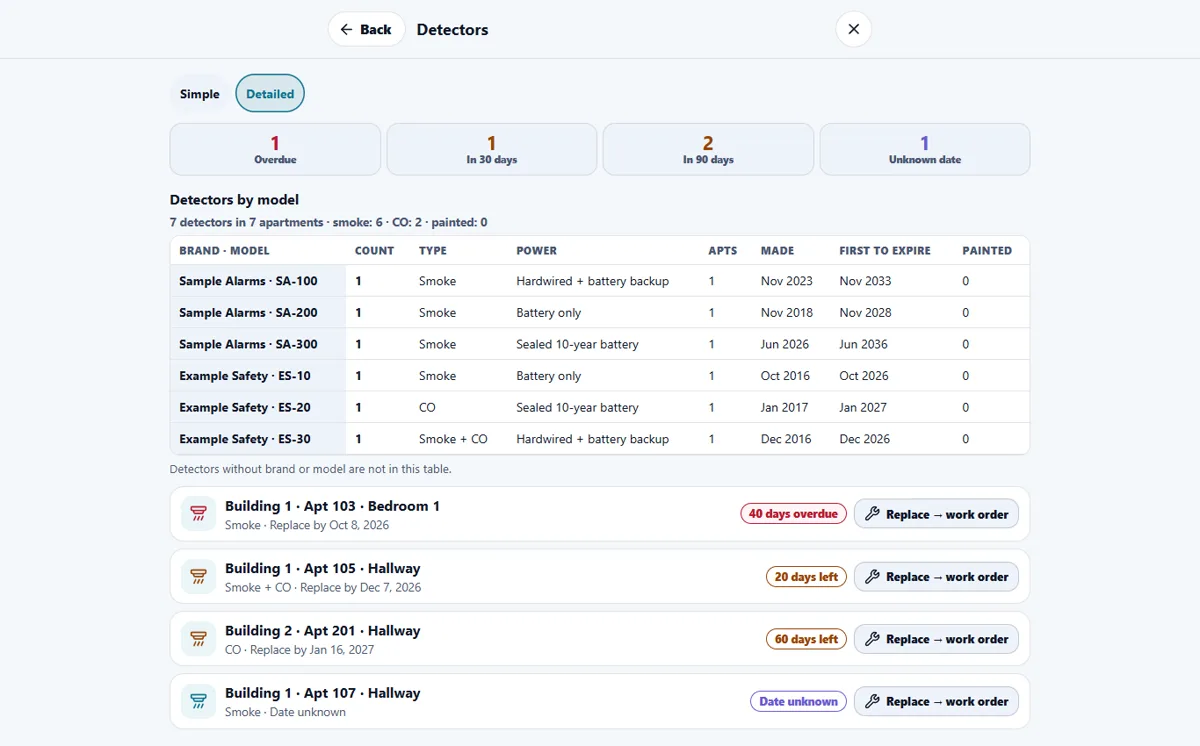
- Smoke and CO detectors. Cards count the detectors that are Overdue, due In 30 days, In 90 days or with an Unknown date. A table groups them by brand and model, and each one has a replace-by date. Replace → work order (property manager) makes the order. If Inventory has the right item chosen, replacing a detector takes one from stock.
- Appliances. Filter by type, by age (New, Old, Past its useful life) or search by model, serial or apartment. The age comes from the label, or from the serial when the brand allows it.
- Apartments. Each apartment shows its inspections, detectors, appliances and open problems.
- Inspection form. The property manager or the supervisor uploads the corporate form (a PDF, a Word file or a photo, read on the device), checks every line, and can also start from the Standard list. Every question has its text in English and Spanish, so each person reads it in their language. Edit, Print blank form, Make default and Archive are in the same list. A property can have up to 20 checklists.
Print and export
Open Export in a campaign. Choose all buildings or one building, Summary only (1 page) or Summary + every apartment, the language (and, if you like, the photos), and then Print / Save as PDF or Download spreadsheet (CSV). The summary is for the boss. The original signatures stay with each apartment.
Tips
Assign the buildings and tell the residents first, then check Tell the residents again the day before: a building whose entry day has passed can only be marked on the door or told in person.
When the module is turned off
With Inspections off, the Inspections tile and everything in it (campaigns, the inspection run, problems, detectors, appliances and the checklists) are turned off. Work orders and Inventory stay on. What you saved is kept and comes back when you turn the switch on.
Related guides
Ready to try it with your own property?
Create your workspace, add your property and turn on the modules you need.